Fish and Seafood | Stock and Soup | Troubleshooting | Care and Maintenance| Pressure Canner Comparison Guide

PRESSURE CANNING METHOD CANNING BASICS
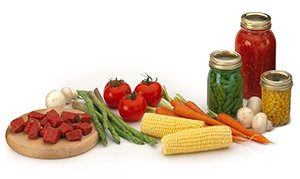 Pressure Canning is the only method recommended by the USDA for safely canning low-acid foods such as vegetables, meat, poultry, fish, and seafood. Tomato products and fruit may also be canned using the pressure canning method in stovetop pressure canners. Always follow the exact procedure and method listed in reliable, research-tested recipes. For the Pressure Canning Method using the Presto Precise® Digital Pressure Canner, click here.
![]() Place canning rack on bottom of canner. Fill canner with 3 quarts of water. Preheat water to 140°F for raw-packed foods or 180°F for hot-packed foods.
Place canning rack on bottom of canner. Fill canner with 3 quarts of water. Preheat water to 140°F for raw-packed foods or 180°F for hot-packed foods.
![]() Be sure filled jars have lids and bands fastened according to the manufacturer’s directions. Use a jar lifter to place jars straight down on canning rack in canner.
Be sure filled jars have lids and bands fastened according to the manufacturer’s directions. Use a jar lifter to place jars straight down on canning rack in canner.
![]() Look through the vent pipe on the canner cover to be certain it is clear before placing cover on canner. To clean the vent pipe, draw a pipe cleaner or small brush through the opening. Place cover on canner (with sealing ring in place), aligning the “V” mark on the cover with the corresponding mark on the body handle and lock securely by turning in the direction indicated to close the cover (clockwise). Cover handles must be centered over body handles. Do not force beyond this position. Leave the pressure regulator off the vent pipe.
Look through the vent pipe on the canner cover to be certain it is clear before placing cover on canner. To clean the vent pipe, draw a pipe cleaner or small brush through the opening. Place cover on canner (with sealing ring in place), aligning the “V” mark on the cover with the corresponding mark on the body handle and lock securely by turning in the direction indicated to close the cover (clockwise). Cover handles must be centered over body handles. Do not force beyond this position. Leave the pressure regulator off the vent pipe.
![]() Vent Pressure Canner: Using a relatively high setting, heat the canner until a steady flow of steam can be seen, heard, or felt coming from the vent pipe. Allow the flow of steam to continue for 10 minutes. Reduce heat, if necessary, to maintain a steady, moderate flow of steam. This period is referred to as venting, or exhausting, and is an important step in the pressure canning process.
Vent Pressure Canner: Using a relatively high setting, heat the canner until a steady flow of steam can be seen, heard, or felt coming from the vent pipe. Allow the flow of steam to continue for 10 minutes. Reduce heat, if necessary, to maintain a steady, moderate flow of steam. This period is referred to as venting, or exhausting, and is an important step in the pressure canning process.
![]() Place pressure regulator on vent pipe. If heat was reduced during exhausting, adjust to a relatively high setting and heat canner. Once the recommended pressure has been reached, processing time begins. Process for the time specified in the recipe. Adjust the heat source as necessary to maintain proper pressure. Follow manufacturer’s instructions for proper canner operation.
Place pressure regulator on vent pipe. If heat was reduced during exhausting, adjust to a relatively high setting and heat canner. Once the recommended pressure has been reached, processing time begins. Process for the time specified in the recipe. Adjust the heat source as necessary to maintain proper pressure. Follow manufacturer’s instructions for proper canner operation.
.jpg)
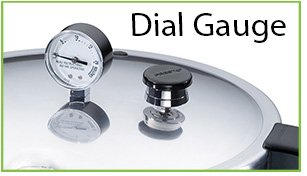
NOTE: Presto manufactures two styles of stovetop pressure canners:
Dial Gauge Canner: Includes a dial gauge with pointer that registers pressure within the canner. Desired pressure is obtained when the dial gauge registers the precessing pressure specified in the recipe.
Weighted Gauge Canner: Includes a 3-piece adjustable pressure regulator that can be assembled to achieve 5, 10, and 15 pounds pressure with a slow, steady rocking motion. Desired pressure is obtained when the pressure regulator begins a gentle rocking motion.
![]() At the end of the processing time, turn burner off and carefully remove canner from heat source. Let pressure drop of its own accord. Once pressure has been completely reduced as noted by the dropping of the air vent/cover lock, remove the pressure regulator from the vent pipe.
At the end of the processing time, turn burner off and carefully remove canner from heat source. Let pressure drop of its own accord. Once pressure has been completely reduced as noted by the dropping of the air vent/cover lock, remove the pressure regulator from the vent pipe.
![]() Let the canner cool for 10 minutes. Then carefully remove the canner cover by lifting it toward you to keep steam away from you when opening.
Let the canner cool for 10 minutes. Then carefully remove the canner cover by lifting it toward you to keep steam away from you when opening.
![]() Using a jar lifter, remove jars by lifting straight up being careful not to tilt them, which could cause liquid to siphon from the jars. Place jars upright on a towel or cooling rack. Be sure to leave at least a 1-inch space between jars during cooling.
Using a jar lifter, remove jars by lifting straight up being careful not to tilt them, which could cause liquid to siphon from the jars. Place jars upright on a towel or cooling rack. Be sure to leave at least a 1-inch space between jars during cooling.
![]() Allow jars to cool naturally 12 to 24 hours before checking for a seal. Do not retighten bands while cooling.
Allow jars to cool naturally 12 to 24 hours before checking for a seal. Do not retighten bands while cooling.
Adjusting for High Altitude Pressure Canning
- Dial Gauge Pressure Canner: When pressure canning at altitudes of 2,000 feet or below, process according to specific recipe. When canning at higher altitudes, process according to the Altitude Adjustment Chart shown in each recipe section.
- Weighted Gauge Pressure Canner: When pressure canning at altitudes of 1,000 feet or below, process according to specific recipe. When canning at higher altitudes, process according to the Altitude Adjustment Chart shown in each recipe section.
- Presto Precise® Digital Pressure Canner: When pressure canning, this canner processes at a temperature of 240 degrees. The canner will automatically adjust pressure for high altitudes in order to reach that temperature.
Fish and Seafood | Stock and Soup | Troubleshooting | Care and Maintenance| Pressure Canner Comparison Guide